architecture blog

A Skinny Solution for Small House Floor Plans

Posted by Krystal Navar on Wed, May 30, 2012 @ 07:05 AM

A while back, we posted about our design process for developing master suite floor plan options for the Cullen Street Small Lot Subdivision project. We presented 6 different layout options, but there were countless variations. Usually, on a project, we decide which layout to run with based on our own design preference and direction given to us by our client.

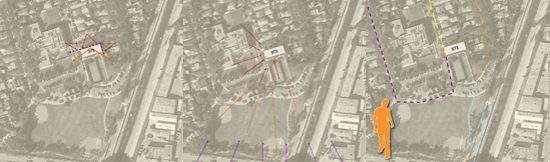
Our 14-home Commerce Villas Small Lot Subdivision project in Tujunga, however, presented a unique set of challenges. To lay out 14 homes on the site in the most efficient manner, taking into consideration setbacks, driveway widths, vehicle backup requirements, etc., each home ended up being a mere 15’-0” wide, measuring from the exterior face of the north wall to the exterior face of the south wall.

small house plans

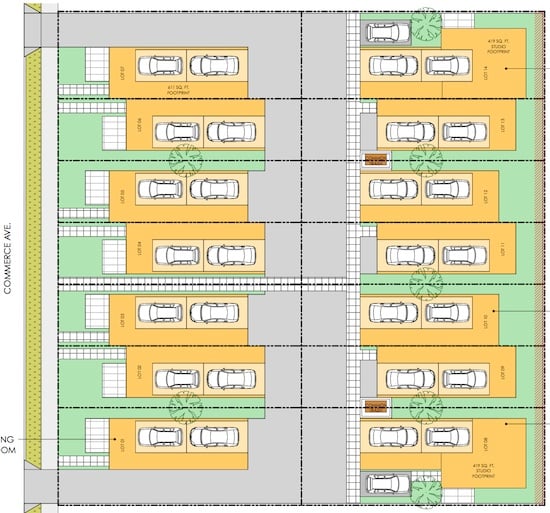
Site Plan of Commerce Villas project

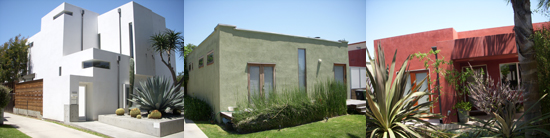
The Cullen Street building footprints are generally square, whereas the Commerce Villas building footprints are long and skinny. So, unlike the Cullen homes, where there were many variations of floor plan layouts, the narrowness of the Commerce Villas homes limited our options. There are only so many ways to lay out a home like this, fitting in the programatic requirements given to us by the client: 2 bedrooms, 2 baths, outdoor decks/patios, and 2 covered parking spaces in 1200-1500 square feet.

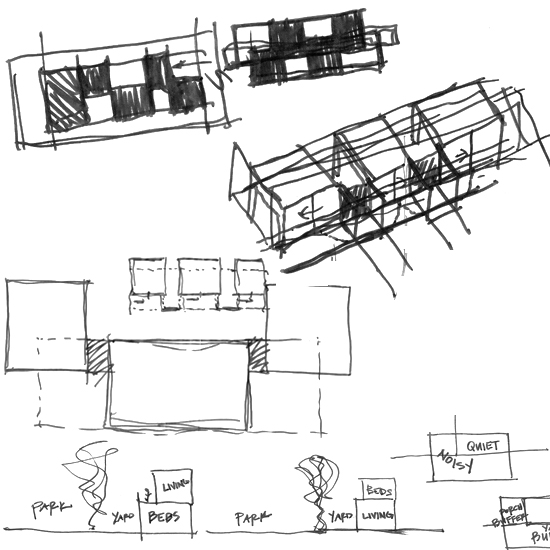
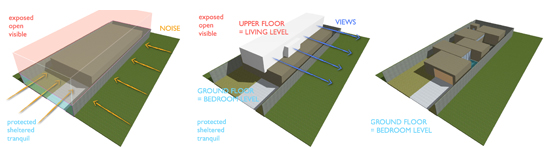
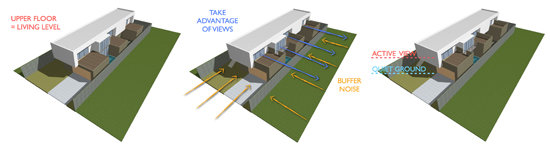
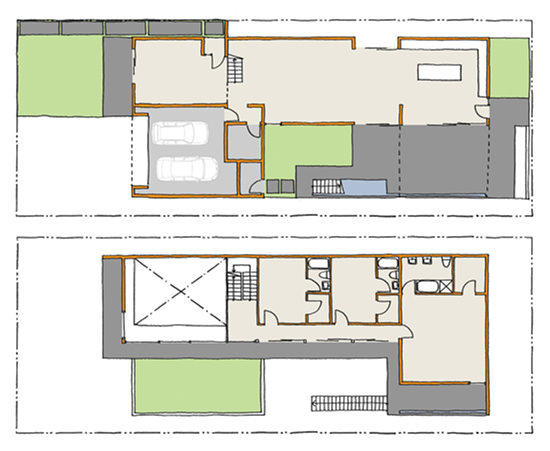
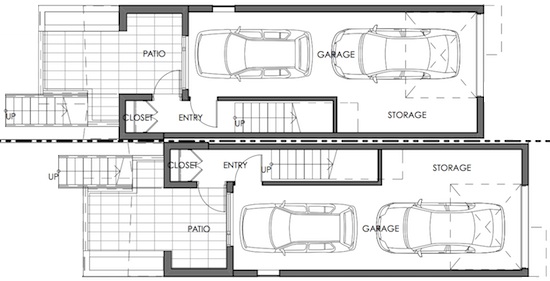
First of all, the narrowness of the homes necessitates that the parking be tandem. (We can discuss the pros and cons of tandem parking all day long, but we’ll leave that to another blog post.) Also, we decided early on through discussions with the client that the living level (kitchen, dining room, living room, and powder room) would be located on the second level and the bedrooms and laundry located on the third level due to the age of the anticipated potential buyer. We expected this buyer would not want to haul their groceries up two flights of stairs. (Many times, though, on other projects, we will locate the living spaces on the upper level when the project is appealing to a younger demographic and the views from the upper level warrant being appreciated during daylight hours and not while you’re sleeping in bed.)

small house floor plans

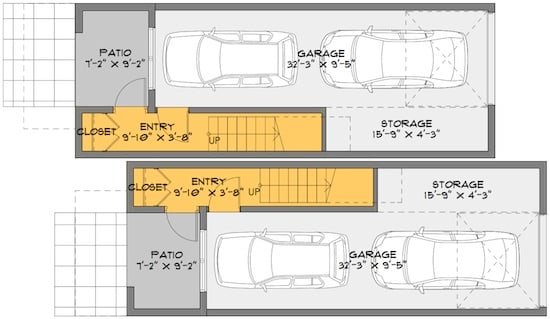
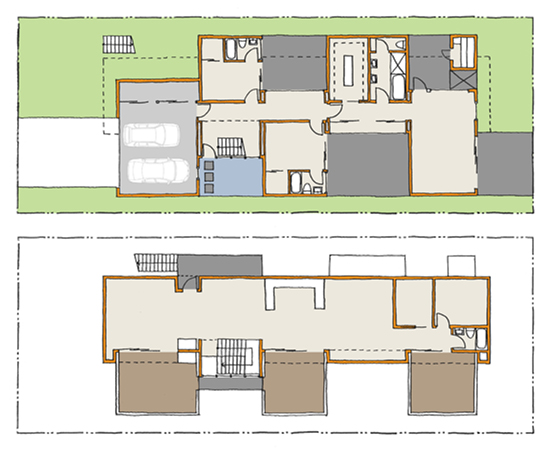
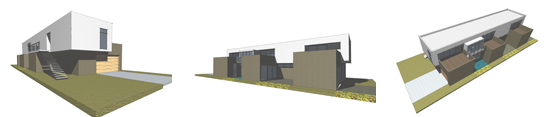
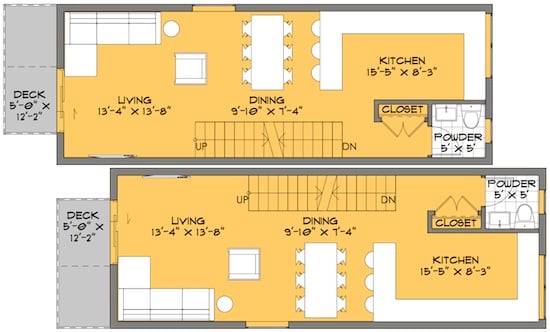
Early first floor plan

skinny solution small house floor plans

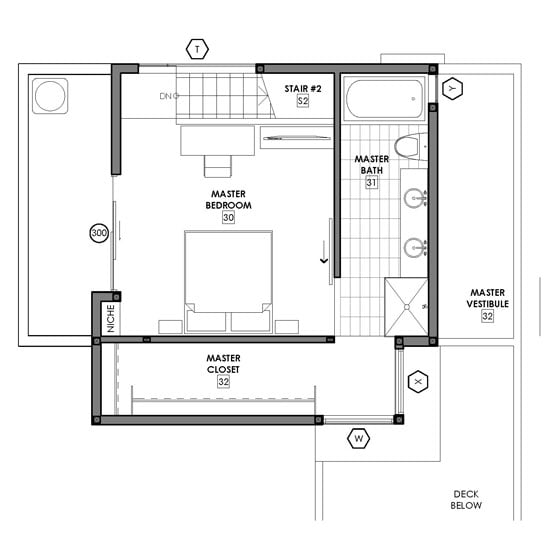
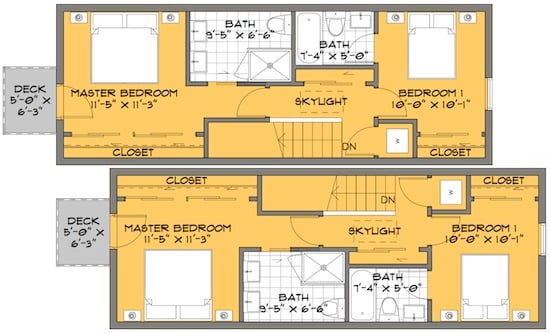
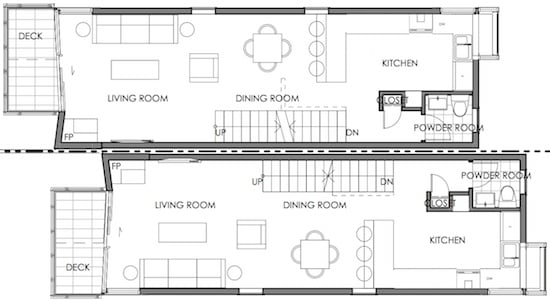
Early second floor plan

la modern skinny house plans 03

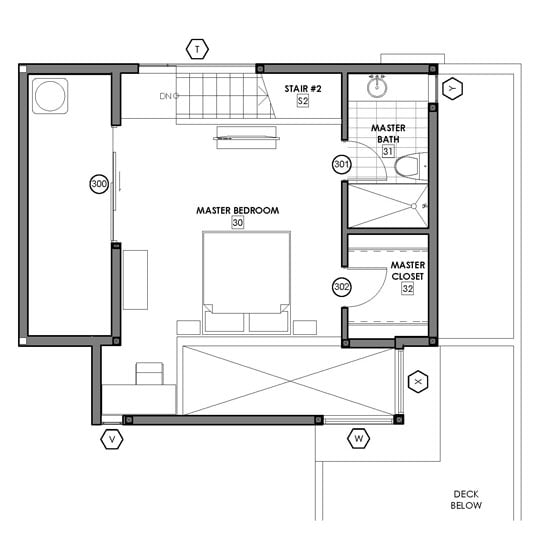
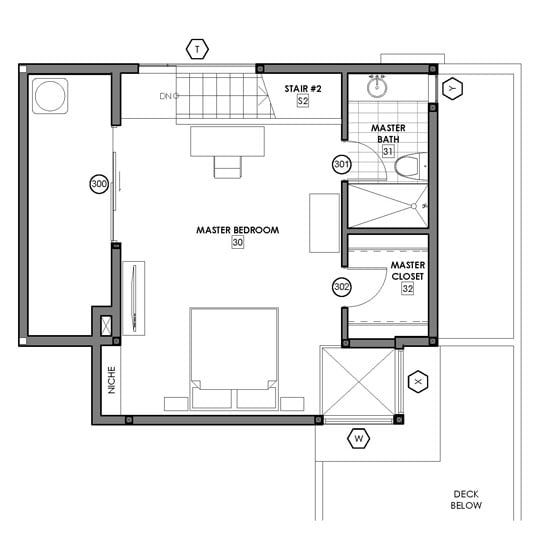
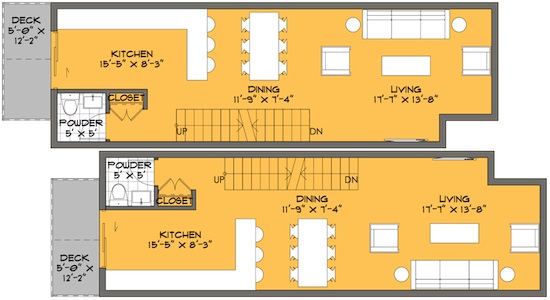
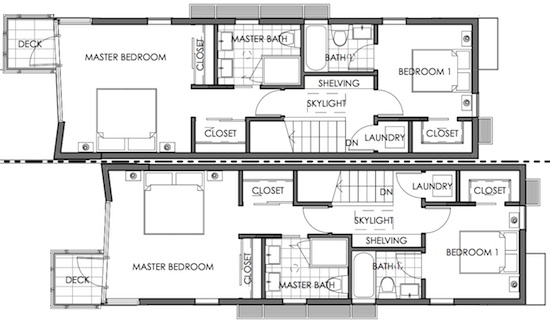
Early third floor plan

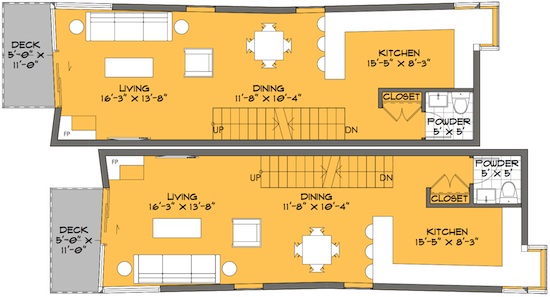
So, keeping these constraints in mind, after locating the parking in the footprint, there is only one space to locate the stair without having the stair separate the living spaces from the deck or yard space. Once the stair is located, the big decision is on which side of the home (east or west) to locate the kitchen or the living room. Should the kitchen have direct access to the deck (so the user doesn’t have very far to travel when bbq-ing) or should the living room? The client chose Option 2.

small house plans la architect small lot

Option 1 showing the kitchen next to the deck. (See Option 2 above with living next to the deck.)

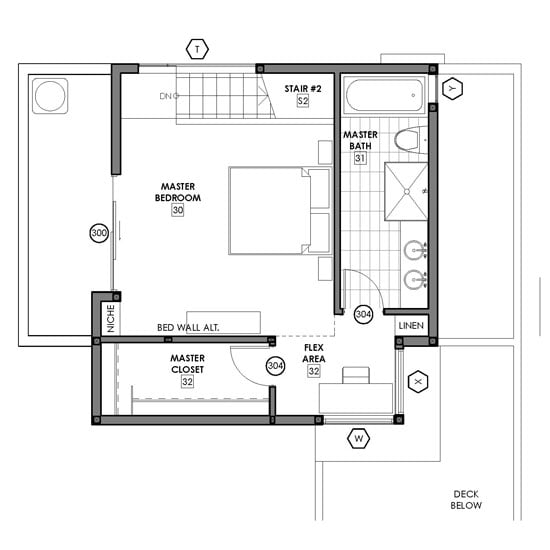
We also developed a second option for the bedroom level with a walk-in laundry room instead of a stacking washer/dryer in a laundry closet. Ultimately, we decided to locate the bathrooms next to one another so they could share a plumbing wall. The client also decided that a walk-in laundry room was not a priority.

modern bedroom floor plans small house

Option 2 showing the kitchen next to the deck. (See Option 1 above.)

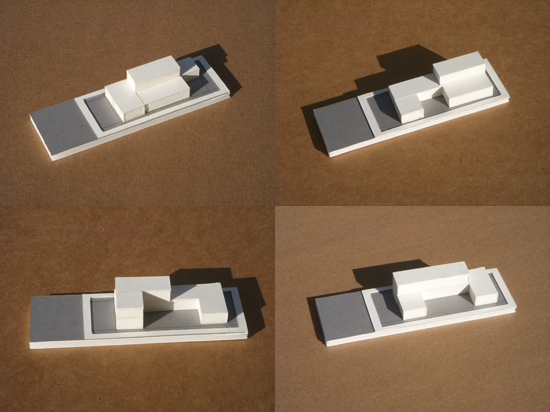
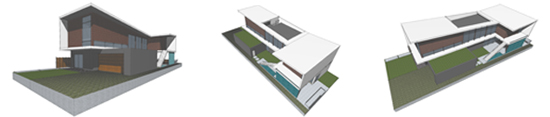
As we spent more time looking at the buildings three-dimensionally in our computer model, we tried ways to spice things up. We couldn’t do anything too crazy as keeping the cost of construction low was a priority. In an attempt to make the 6’-0” spaces between the buildings a more interesting space to occupy, we angled the exterior walls facing those gaps. However, because the walls could not be angled out to make the buildings greater than 15’-0” wide, the walls had to be angled in, making the already limited interior spaces smaller. When your home is only 15’-0” wide, every inch counts. Ultimately, we decided that the angled walls were not angled enough to be worth the effort (or implied cost), so we straightened them back out.

small lot house plan

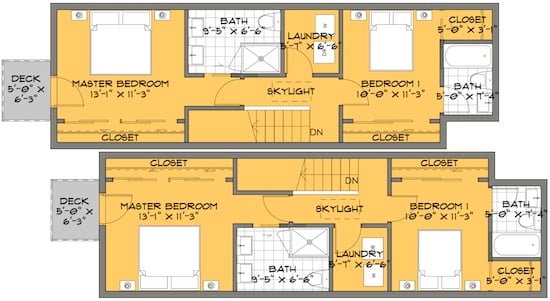
Second level floor plan showing angled walls

In the latest layouts, we did keep the angled walls on the front of the units in order to give the elevation a bit of shadow-play and interest. As you may have already noticed, we also staggered the building pairs. We did not want to present the street or the interior driveway with a flush wall of 3-story homes. Staggering the homes gives these elevations a bit of relief and creates a more interesting pedestrian experience.

modern small house plan

Latest first floor plan

narrow house floor plan

Latest second floor plan

modern small lot floor plan

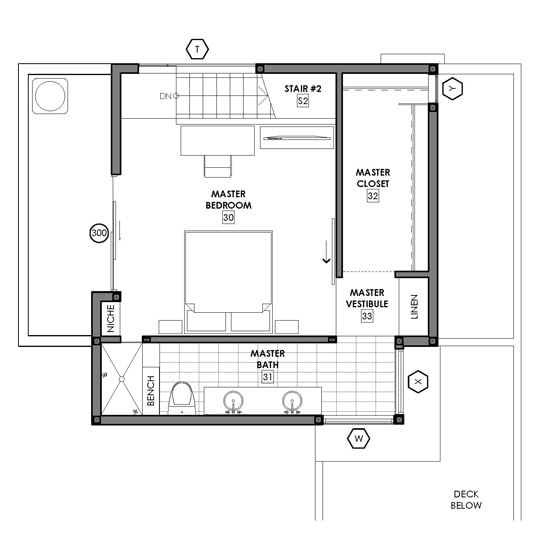
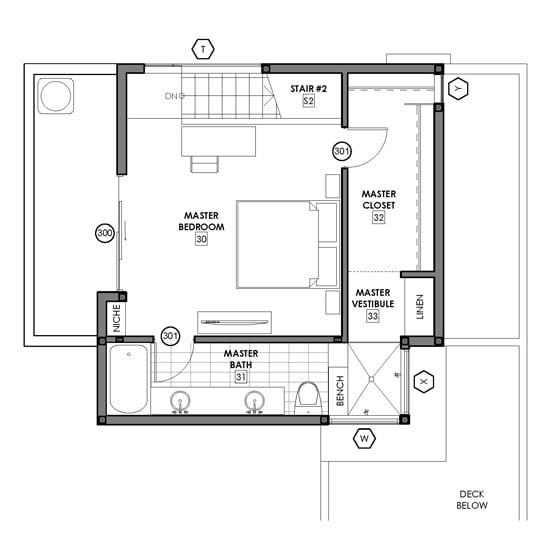
Latest third floor plan
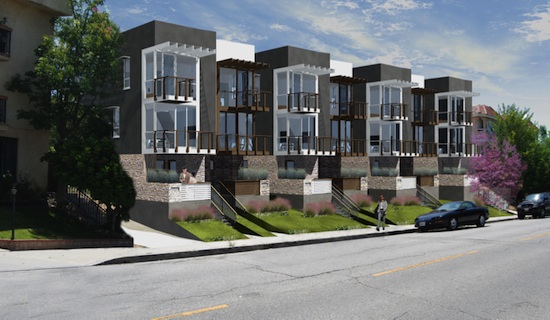
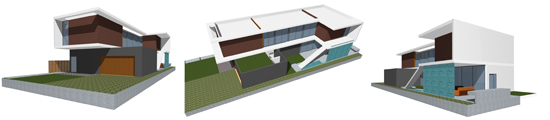
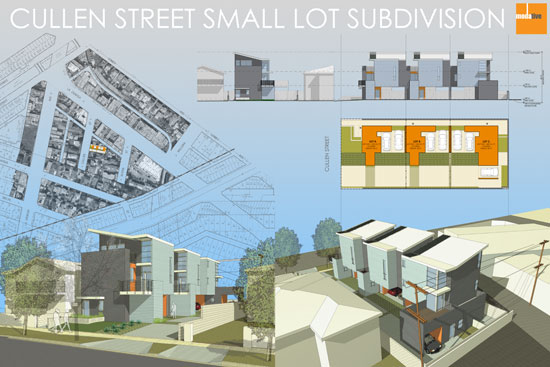
small lot subdivision tujunga

Project rendering

Post by Krystal Návar. Contributors to this post include Christian Návar, Derek Leavitt and Michael Scott .

Tags: los angeles architects, home size, Floor Plans, Residential, Small Lot Subdivision, small homes, Small House, affordable modern architecture

A Los Angeles Architecture Firm's Design Process

Posted by Krystal Navar on Thu, Jun 23, 2011 @ 06:06 AM

Different architecture firms approach the design process in different ways. Here at Modative, we are beyond thorough. Recently, we began working on a new single-family residence in Culver City, CA, a stone's throw from our office. We thought it would be fun to take you through Modative's design process, using this new project, Roberts Avenue, as the example. So, here it goes.  

Before pen ever meets paper, we undergo a thorough site analysis. Many firms skip right on by this, what we feel to be, the crucial first step of the design process. We believe that the site should influence the design. Our site analysis covers topics such as physical site conditions, prevailing winds, street grids, circulation to and from the site, views in and views out, noise, and neighborhood character.

Site Analysis Diagram

3 diagrams showing views, noise, and pedestrian access

Residential Site Views

View north on Roberts Avenue

Residential Site Views

View from what will be the second floor of the new house

Architecture Neighborhood Character

A few interesting modern homes in the neighborhood

We keep the client involved in every step of the process, so once we've hashed through the site analysis, we present the information we've gathered to the client. We figure that if the client is with you through these initial steps, once you get into the schematic design phase, the sketches you show him/her will not seem to have come out of nowhere. Most importantly, the decisions you are making will not seem arbitrary -- they will be rooted in your initial site and precedent studies. Both you and the client will be able to reference back to this gathered information as the design progresses. 

At this point, during our first presentation to the client, we also discuss the project's program, budget, and schedule.  Once we have a better understanding of these three criteria, we launch into the design of the building. On this project, our intern, Jonathan Ackerman, built a series of small massing models at 1/16"=1'0" studying possible configurations based on allowable square footage and the influences of the surroundings. This is where the site considerations previously mentioned come into play. Knowing that this site is located next to a public park and across the street from an elementary school informs how the masses are organized.

los angeles architect models

4 massing models by Jonathan Ackerman 

The next step is to sit down with everyone in the office (all 5 of us at the time) and brainstorm. We give the same presentation to the office that we gave to the client and go through each of the massing models. Then the trace paper is rolled out, everyone gets quiet, and starts feverishly sketching.  This is the fun part. (I like to stop sketching 5 minutes into it, take a peak at everyone else's sketches, and let my thoughts be catapulted in a completely new direction.)  This is the time to not hold back. Every idea is possible. 

Architect Sketch

Sketches of what will become Scheme A 

When everyone has exhausted their supply of trace, each person explains their thoughts to the group. (It's amazing how, after seeing the same site analysis presentation, everyone's schemes have common threads. It shows you that the site really does drive the design.) Once we've thoroughly dissected each person's concepts, we settle on 2-3 schemes that the project designer will further develop to show the client. 

Architect Sketch

Sketches of what will become Scheme B

Before starting to develop these schemes, we research relevant precedents. Inspiration and direction both come from studying what others have done to solve problems similar to those you are facing in your design challenge. 

Architecture Precedents

Architecture Precedents

Precedent images taken from slides from our client presentation

At this point, the project designer takes everyone's sketches and began translating these sketched concepts into actual floor plans and massing models in ArchiCAD. We decided to continue to develop 2 of the schemes that came out of our in-office charrette.

After these floor plans were developed enough to talk about, we had another quick meeting with the office to get input from everyone on any minor adjustments that need to be made. 

Los Angeles Architect

Scheme A draft renderings

Los Angeles Architect

Scheme B draft renderings

Maintaining this idea that the client needs to be brought along beside us every step of the process, before we even show floor plans and renderings, we show some 3D diagrams explaining the reasoning that is informing our design decisions.

Architect Diagram

Los Angeles Architect Diagram

Scheme A diagrams

Los Angeles Residential Architect

Scheme B diagrams

At this point, all of the layouts are in ArchiCAD. However, we choose to sketch over print-outs of the layouts and show these sketches to the client instead of showing them hard-lined floor plans. Hard-lined floor plans, this early in the design process, give the impression that everything is figured out and that it's too developed to make changes. It's important, at this stage, for the client to feel that their input is welcome and that the design is a malleable thing, not a fixed thing. We also show "sketchier" renderings instead of realistic-looking renderings. 

House Floor Plan

Los Angeles Architect

Scheme A sketchy floor plans and renderings

Architect Floor Plan

Los Angeles Architects

Scheme B sketchy floor plans and renderings

At the end of our presentation of these 2 schemes to the client, the client picks 1 scheme to run with. (They picked Scheme 1. They like -- and so do we -- how the living is on the upper floor to take advantage of the views.) Once 1 scheme is chosen, we have finished the Schematic Design phase and move into the Design Development phase where the floor plans are tightened up, the look of the building is massaged, and materiality that supports the concept is explored. The Schematic Design phase, when all of the above steps are taken, serves to lay the framework for all of the decisions made in the Design Development phase. This is critical in the development of a thoughtful, relevant design.


Post by Krystal Návar. Contributors to this post include Christian Návar, Derek Leavitt and Michael Scott .

Tags: los angeles architects, Modern Design, Architecture portfolio, Inspiration, Architectual Practice, Floor Plans, Residential

A Healthy Obsession with Small House Floor Plans

Posted by Derek Leavitt on Thu, Mar 11, 2010 @ 15:03 PM

One of my favorite occurrences in the office is when my business partners and I have an impromptu design session, as recently occurred on the Cullen Street Small Lot Subdivision Project. Even though the project is far along in the architecture process (it was just submitted for permit plan check), we came to realize that the third floor plan master suite in one of the units was not up to par.

small house floor plans

The plan in question is the top floor of Unit #3, the unit with the corner window in the foreground of the bottom right rendering.


These design sessions are very informal and typically consist of two of us hovering over the third person's computer screen blurting out comments.

"Move that wall over 6 inches left."

"OK, now let's try to fit the shower in that corner."

"Are you crazy? You can't put the shower there. We can't plumb that and it's a privacy nightmare!"

"What if we flip it to the other side of the room? Let me see it in 3D."

"That's better. Let's make that an option."

Arguments develop over seemingly small things like how many dressers people like to have in their bedroom. These often heated conversations are all in the name of great design. I think the tension is a good thing.

Average design is quiet. It rarely moves people to take a real stance. 

Even something as simple as a master bedroom floor plan revision goes through this filter. Three (or more) design opinions pushing to make it better. These modern homes are small. Well designed floor plans are critical.

Here's a look at the multiple floor plan options that came out of this particular meeting of the minds.

Floor Plan Option 1 - The Original

This is what we started with: a floor plan with some problems. The wide "X" at the bottom of the room is an open-to-below space, meaning it's open to the living room below. Very loft like. We love open-to-below spaces in our homes; however, in this case. it was creating problems. The (low) bed wall was too short and the access to the office nook was awkward. There were other issues as well, but I'll spare you those details.small house floor plans


Floor Plan Option 2 - The Big Bedroom

The simplest solution to the issues in the original plan was to expand the room downward, closing off most of the open-to-below space. This, however, created a bedroom that was a bit large. If someone wanted a TV in the bedroom, they'd have to put it on a side wall because the wall across from the bed was too far way. Even more of an issue is that most people would rather have a larger bathroom and closet with this expanded space, not just a huge bedroom.modern house floor plans


Floor Plan Option 3 - The Vestibule

So that led to Option 3, where we moved that bathroom over to the expanded space. This allowed for a larger bathroom and closet. We also added a little vestibule area with a linen closet. The shower has a little window into the bedroom - how sexy. The whole bath/closet area can be closed off with a barn style sliding door. All the spaces have lots of natural light.modern floor plans


Floor Plan Option 4 - The Voyeur Shower

Similar to Option 3, but we moved the shower to the corner glass window. I know, very voyeuristic. I wasn't a big fan of this shower location, but it did create enough room for a tub in the bathroom.small house floor plans

Floor Plan Option 5 - The Big Bath & Closet

In this option we flipped the closet and shower locations. This created a large bathroom and closet. It's a technicality, but it's much easier to run the plumbing with the bathroom in this location.small modern home plans

Floor Plan Option 6 - The Flex Space

Here we took Option 5 and reduced the closet size creating a flex area for a desk, exercise equipment, or crib. Spaces like this are valuable in these small urban homes. This option also allows for bed wall flexibility.small lot house plans


I'd love to get some feedback as to which option you would prefer to live in. And if you'd like to offer up more than just a vote, feel free to leave a comment.

In several days, I'll reveal which option the clients selected.


Tags: Modern Design, Architectual Practice, Floor Plans, Small Lot Subdivision, small homes, Small House